IOTivity-Lite-setup
IoTivity setup
Introduction
This repo contains bash scripts to setup a build enviroment to use DeviceBuilder with IoTivity. The build enviroment is taylored to create OCF Server Devices.
Table of Contents
- IoTivity setup
Installation
The local installation of the Tool Chain can be done with a single curl command:
curl https://openconnectivity.github.io/IOTivity-Lite-setup/install.sh | bash
The curl command sets up the Tool Chain on the (development) machine. The script installs various tools and github repositories that are needed to use the Tool Chain. For windows, visual studio is needed as an extra installation step, see here for Windows Specific additional instructions.
Executing the installation command requires:
- Internet access
- System that contains the BASH shell script environment.
Note that installing a git client on Windows also installs a BASH shell script environment.
Use the following command to use the master (latest code) of Iotivity-Lite:
curl https://openconnectivity.github.io/IOTivity-Lite-setup/install-master.sh | bash
The Tool Chain
The following Tool Chain is created:
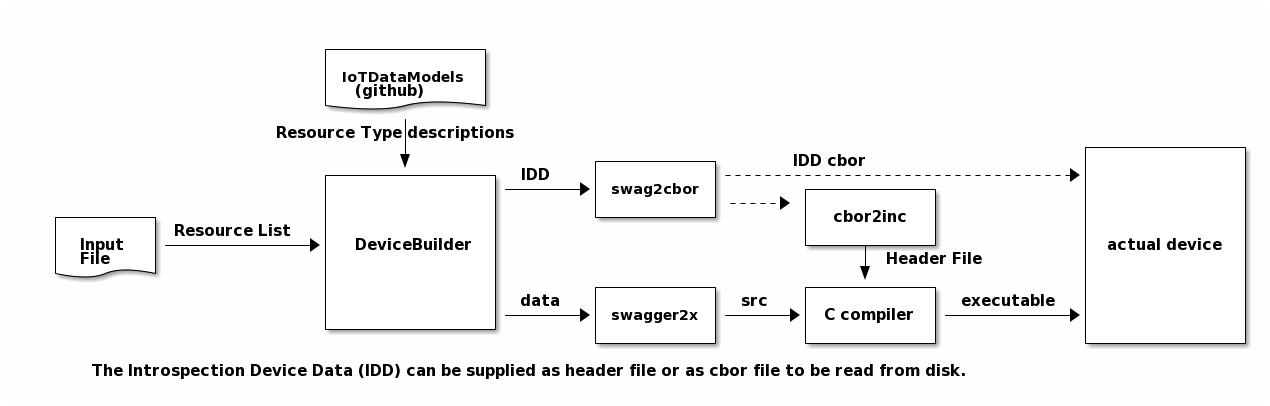
- DeviceBuilder Merges all input resources to a single file, stripping out unwanted properties, methods, etc. The list of desired resources is conveyed via an input file. The output are swagger2.0 files containing all resources that can be used to generated code and the IDD.
- swagger2x Creates from the output swagger file the C application code, based on IoTivity stack.
- swag2cbor Creates from the (JSON) swagger file the IDD in CBOR.
- cbor2inc Creates from the IDD CBOR file the C style header file containing the IDD information.
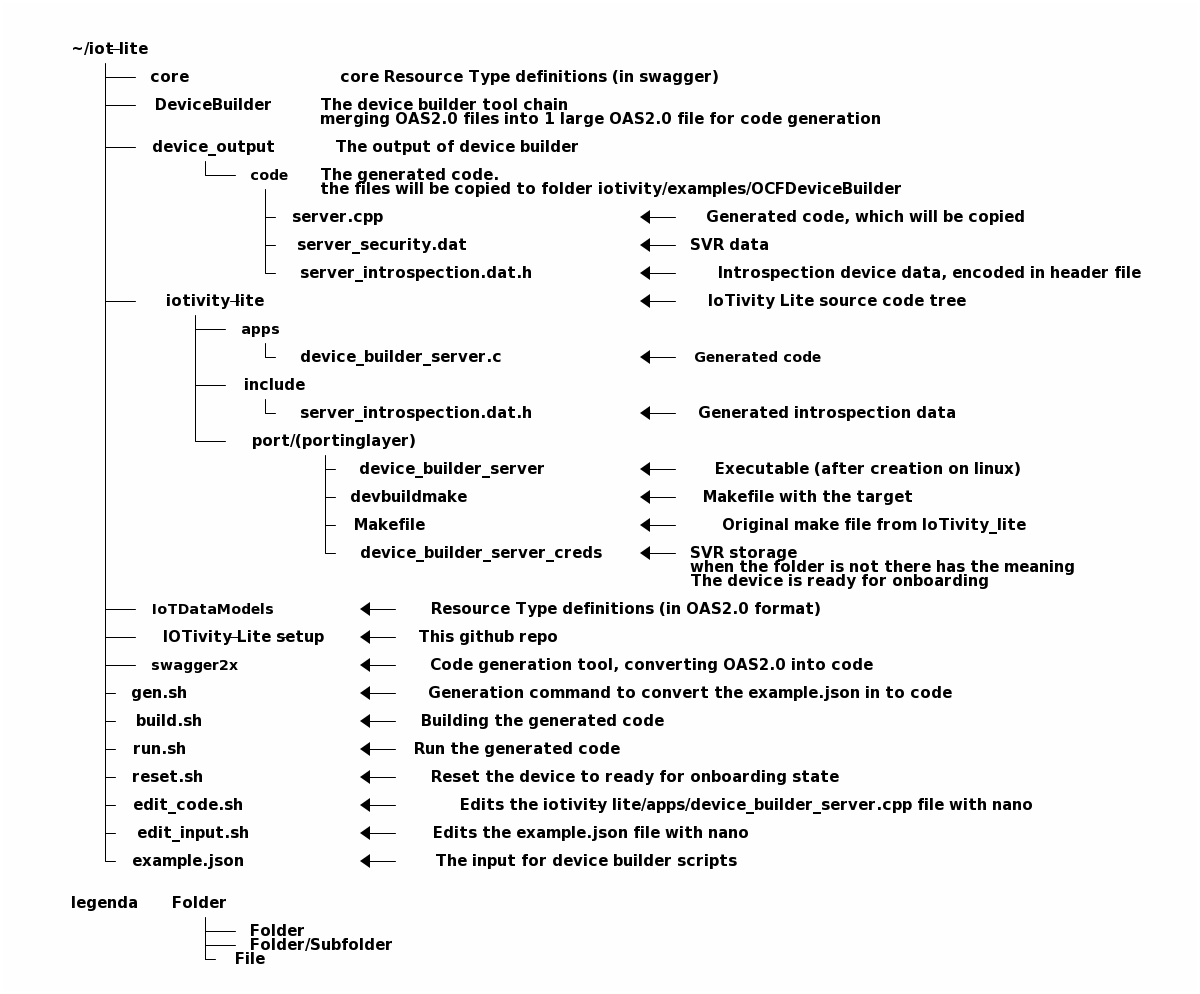
Folder Structure After Installation
Folder structure after everything is installed and code is generated:
 The installDeviceBuilder script generates scripts in the top level folder (e.g. the folder above this repo).
The generated scripts are convienent scripts, e.g. they are short cuts for entering generation, build, excute and reset commands.
For more advanced usage, use the commands in the scrips itself, it allows for more flexibility in the development process.
The installDeviceBuilder script generates scripts in the top level folder (e.g. the folder above this repo).
The generated scripts are convienent scripts, e.g. they are short cuts for entering generation, build, excute and reset commands.
For more advanced usage, use the commands in the scrips itself, it allows for more flexibility in the development process.
Development Setup
Typical development setup contains the following configuration:
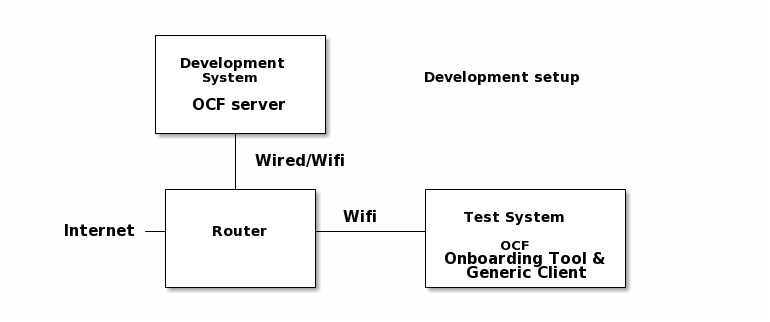
Where:
- Router = home router, with Wifi Access point to connect the Android device The IP network should be IPv6 capable and have CoAP multicast enabled.
- OCF Server = is the device that is being used to build the OCF server
- This can be a development machine: Linux PC, Windows PC, Raspberry Pi, ..
- Test system, to run an Onboarding Tool and Generic Client (OTGC)
- to interact with the OCF server securely, the device needs to be onboarded to the secure domain. This is the function of the Onboarding Tool. OTGC has the Onboarding Tool integrated with a Generic Client. The Generic Client can interact with resources defined in the OCF server. OTGC runs on the following platforms:
- Linux PC (build your own on target PC)
- Raspberry Pi (build your own on a PI)
- Android Phone (OTGC as pre-build apk available)
- Note: If a windows PC is available Device Spy can be used.
- to interact with the OCF server securely, the device needs to be onboarded to the secure domain. This is the function of the Onboarding Tool. OTGC has the Onboarding Tool integrated with a Generic Client. The Generic Client can interact with resources defined in the OCF server. OTGC runs on the following platforms:
See here for more information on OTGC.
Note that a Windows (10) PC can be used to run OCFDeviceSpy as OCF Onboarding Tool and Client. Device Spy is a lower level OCF client where the user needs to interact with the device on JSON level.
Referenced Information
| Website | Repo | Description |
|---|---|---|
| DeviceBuilder | DeviceBuilder | Tool Chain |
| swagger2x | swagger2x | templated code generation |
| IoTivity | IoTivity | OCF Secure IP Device Framework |
| [OTdataModels | IOTdataModels | website: IOTdataModels |
| core | core | OCF core data models |
| OCF clients | OCF clients | OCF development clients (prebuild) |
Development Flow
The development flow is based on bash scripts, hence the flow is generalized for Linux based systems. The development flow is depicted the figure below:
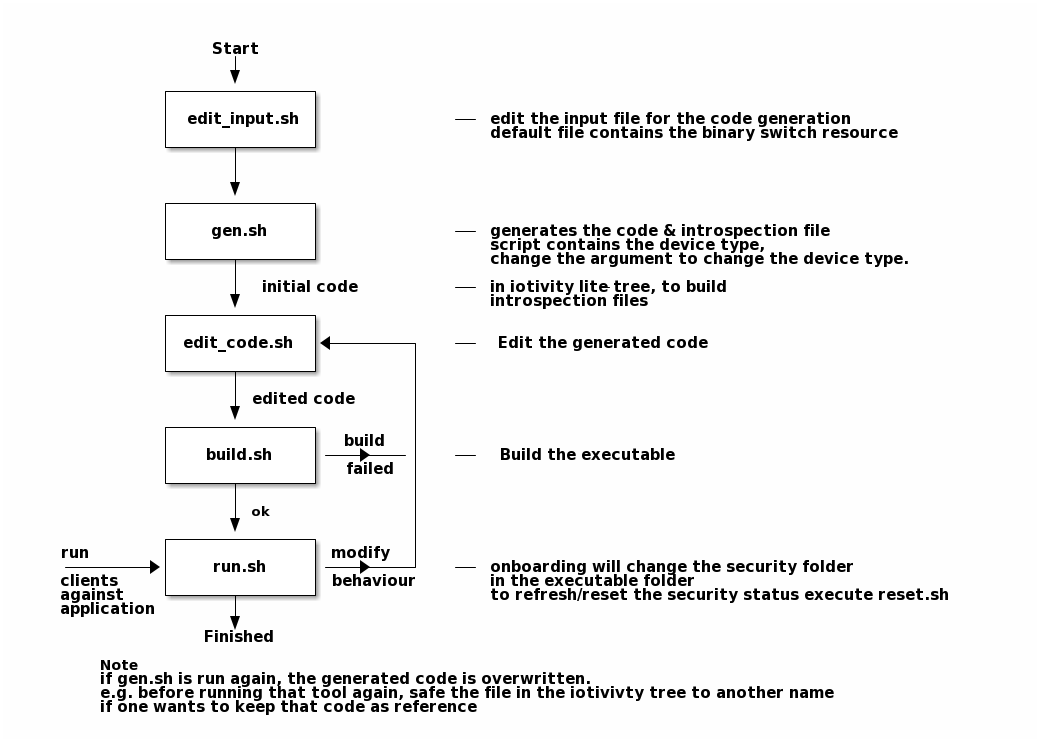
Initial Flow
These steps needs to be executed in the <>/iot-lite folder, e.g. the folder that gets created by running the curl installation command. The goal is to run an OCF server by creating code, building and running the OCF server application.
- gen.sh Script to generate the code that represents the device. The input is the file used to generate the code is example.json.
- build.sh Script to build the generated code. The device_builder_server.c code is being build is located at <>/iot-lite/iotivity-lite/apps folder.
- run.sh Script to run (launch/start) the compiled (generated) code. The script executes device_builder_server application in the <>/iot-lite/iotivity-lite/port/linux folder.
Repeat Flow
The repeat flow is modifying the generated code (without code generation):
- edit_code.sh Script to edit the generated code with Nano.
- build.sh Script to build the generated code.
- run.sh Script to run (launch/start) the compiled (generated) code.
If the device needs to be in ready for onboarding (for example after a crash), then run the script reset.sh
OCF clients
Information and Installers about the OCF clients for development support can be found here
Scripts
Edit input for code generation
Script: edit_input.sh
This script edits the device builder input file with Nano editor. The input file being edited is located at the top of the installed tree: <>/iot-lite/example.json Typical changes on the input file for code generation can be:
- Adding/changing resources.
- Removal of optional properties on the resource.
- Removal of the UPDATE method (e.g. POST).
Things to check:
- Do not remove mandatory features from a resource
- Make sure that if an UPDATE method is removed, also change the supported inteface (if)
Information on available which device types should implement which resources can be found here. Information on the individual resources in OAS2.0 format can be found in here.
Recommendation:
Make sure that before starting to change the generated code, all resources & properties are supported by the generated code.
Device Builder Input file
More information on the Device Builder input file can be found here This link contains the syntax and some examples of input files.
Nano
Nano is a small editor that can be used to edit files in windowless system. Nano is supplied on various linux systems like ubuntu and raspberry pi. Please make sure when generating a new version, that a changed file is saved under a different name. The nano beginners guide is available here.
Generate Code
Script: gen.sh
This script runs the Tool Chain with the predefined arguments:
- <>/iot-lite/example.json as input file.
- light device as device type.
Changing the device type of the OCF Server
The device type can be change from oic.d.light (default) to something different. The following mechanisms are available to change the device type:
- Change the server code from oic.d.light to a specific value.
- Search for oic.d.light in the server code, and change the value.
- No need to re-generate the server code.
- Can be done when one is already changing the server code.
- Change the gen.sh file e.g. replace “oic.d.light”
- To see the changes the code one needs to be re-generated by running gen.sh
- Can be done when no code has been changed yet.
Changing the name of the OCF Server
The name can be change to something different. This can be done by giving an input parameter to gen.sh. for example gen.sh “blahblah” will turn the name of the server into “blahblah”. Default the name of the device is “server_lite_<PID>”, the PID is the current process number of the script. Hence the default name scheme creates unique device names.
WARNING
Running this script generates the device_output folder AND copies the result to the correct executable folder in the iotivity-lite tree structure.
More info of the DeviceBuilder script can be found here.
Note that running gen.sh will overwrite the made code changes!!
Edit Code
script: edit_code.sh
This scripts edits the generated C code device_builder_server.c with Nano. The script loads the Nano editor with the generated code in the iotivity-lite tree. The saved file can be compiled without copy pasting.
Note that running gen.sh will overwrite the made changes!!
Typical changes to be applied on the code:
- Making sure that the code passes OCF Compliance Test Tool (CTT).
- Some resources may have mandatory behavior not captured in OAS2.0 format. This behaviour has be added in the resource handlers functions of the resource.
- Attaching the code to hardware.
- See the TODO comments in the generated code.
The TODOs indicates where the code could be inserted.
There are different insertions, depending on whether the resource is a sensor or an actuator.
- See also the raspberry hat examples These examples have code to talk to the sensors and actuators of raspberry hat.
- See the TODO comments in the generated code.
The TODOs indicates where the code could be inserted.
There are different insertions, depending on whether the resource is a sensor or an actuator.
More info about the structure of the generated code can be found here.
Building the Code
Script: build.sh
Linux Only
This script builds the app device_builder_server.c by means of make.
It starts in the iotivity-lite/port/linux folder the make -f devbuildmake device_builder_server command.
To build another port (e.g. OS):
- Uncomment out the listed port in the script, and comment out the default linux.
To have clean build edit the build.sh file and comment out the line: make clean.
To build a server that is cloud capable, add on the command line the compile directive: CLOUD=1 e.g.: sh build.sh CLOUD=1
Run Code
Script: run.sh
Linux Only
This script executes the compiled executable in the folder where the executable resides in.
It executes the device_builder_server executable (e.g. the server application) in folder:
<>/iotivity-lite/port/linux/
Note: The executable needs to be started in folder where it recides to avoid issues with reading the security data.
Reset Device
Script: reset.sh
This script deletes the SVR settings in the security folder:
<>/iotivity-lite/port/linux/device_builder_server_creds
The device will go to the ready for onboarding state.
Generate PKI certificates and header files
Script: pki.sh
This script creates PKI based certificates and converts them into an header file. The generated certificates are TEST certificates, these certificates are to be used for testing only.
See here for more info on security options.
Adding your own Resource models
Instructions to add your own Resource models are available here.
Windows Specific Instructions
Windows specific instructions (using Visual Studio) are available here.
Issues
Please execute the curl command in a folder hierarchy without blanks. Blanks in the folder name causes issues with going back and forth in the created folders.